Barbacoa Burritos

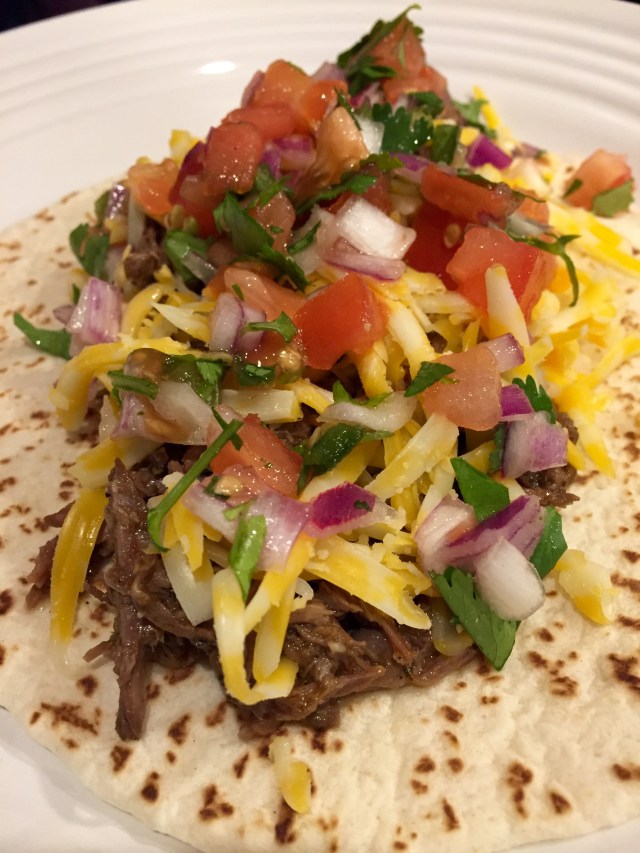
Barbacoa open face taco

As of late, my Facebook feed has increasingly posted “how to make ______(fill in the blank)” videos. Whether it’s Tip Hero, Huff Post, or Buzzfeed Food, it can make for a mouth watering moment. Not only do I get these, but so does Chris or a friend posts one and he’s messaging me the link with a request to make said item of the moment and it was one of those videos that brought about a little research, recipe comparison, and finally we settled on this one. When it comes to meals, Chris primarily grills, and once in a blue moon, occasionally cooks the whole meal. I’m proud to say, with the exception of the pico de gallo, he did this one all on his own from start to finish and it was darn tasty.

Ingredients:

  • 3 pounds beef chuck roast, trimmed of some fat and cut into 4-5 pieces
  • 2 tsps. salt
  • 2 tbsps. olive oil
  • 3 bay leaves

For the Barbacoa sauce:

  • 1 cup beef broth
  • 1/4 cup apple cider vinegar (ACV)
  • 7 cloves garlic
  • 2 tbsps. ground cumin
  • 1/4 tsp. ground cloves
  • 1-2 tsps. ground black pepper
  • 1 tbsp. dried oregano
  • 1 small can chipotle peppers in adobo sauce
  • juice from 1/2 a lime

Preparation:

Over medium heat, drizzle the olive oil in a large pan, add the meat, sprinkle with salt and pan sear the meat for the duration it takes to make the sauce.

In a blender, add the ACV, the small can of chipotle peppers with adobo sauce, ground cumin, ground pepper, ground cloves, dried oregano, garlic, beef broth and blend until smooth. Turn the meat to sear on the other side. Once seared, transfer the meat to the crock pot and top with the bay leaves, and pour in the sauce. Cover and cook on high for 6 hours. In 5 hours, using two forks, shred the beef and allow to cook for another hour. At the end of 6 hours, remove the bay leaves, squeeze the juice out of half of lime, add in a pinch or two of salt, to taste.

Add meat to tortilla shells and top with desired garnishments.

Source: https://www.youtube.com/watch?v=oltFEuuJFMg&feature=youtu.be


Posted in Meat, Mexican, Uncategorized | 2 Comments

Creamed Chicken

Creamed Chicken

This dish right here is nostalgia on a plate and it’s similar to chicken and dumplings. It reminds me of my childhood and visiting my grandparents farm. The dish is rather simple and from my earliest of memories, it’s been one of my favorites. I’ve mentioned before that my grandma rarely used a recipe and this dish is one that doesn’t require exact measurements. In fact, it’s more of this and that and adjust as needed type of recipe. It’s quite simple, really and ranks high on the list of comfort foods. This will warm up your insides fast on those cold, windy wintery days.

Ingredients:

  • 1 chicken fryer sans the giblets
  • 1 chicken bouillon cube
  • 1/2 – 3/4 cup milk
  • 1 cup flour
  • fresh cracked pepper

for the drop biscuits:

  • 2 1/4 cups Bisquick mix
  • 2/3 cups milk

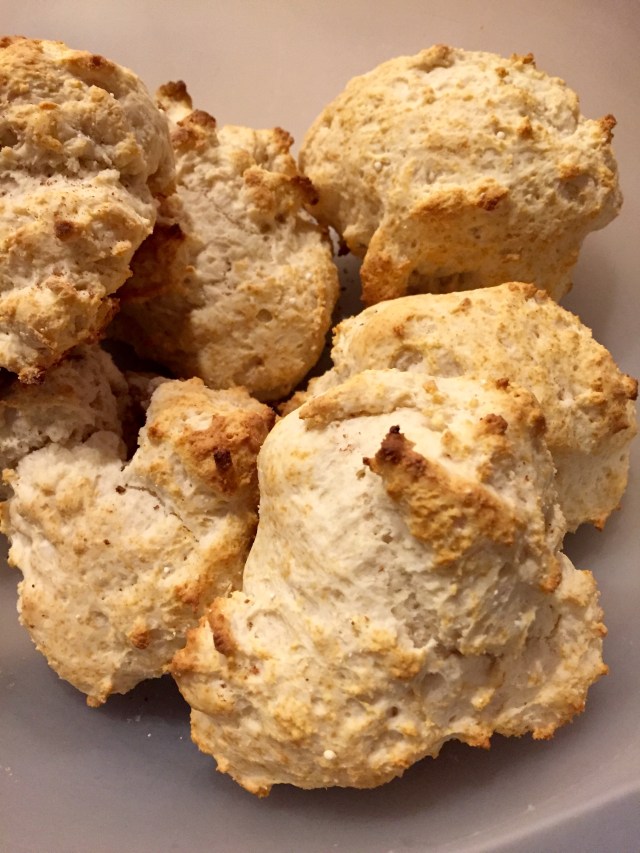
Bisquick Drop Biscuits

Preparation:

In a stock pot, place the fryer in and cover with water. Boil over medium high heat until the chicken is completely cooked. Remove chicken to a plate and allow to cool enough to debone and shred. Keep the medium high heat temperature on the stove top. Using a fine wire mesh strainer, remove the chicken fat/ froth from the pot. Once mostly cleared, add in a chicken bouillon cube and stir until dissolved. In a small bowl, whisk together half of the milk with half of the flour until smooth. Slowly incorporate some of the hot chicken stock to the milk/ flour mixture, stir, and transfer to the pot. Repeat with the remaining half of milk/ flour. Allow the mixture to maintain a slow boil, stirring frequently to prevent any sticking on the bottom of the pan. The mixture will begin to slowly thicken, once it does, add the chopped/ shredded chicken and reduce temperature to low.

Make biscuits according to box instructions.

To serve, take one biscuit and either crumble in large chunks on a plate or keep whole, cover with chicken mixture, and add fresh ground pepper to the top. Enjoy!


Posted in Chicken, Uncategorized | Leave a comment

Sausage and Cheddar Cheese Scones

Sausage and cheddar cheese scones

While breakfast during the weeks is kept fairly simple, I do like to spend a bit more time in the kitchen on the weekends. Take these scones for instance, these are perfect for a weekend breakfast or brunch. They’re flavorful and in lieu of a typical sweet scone, this one is savory.

Ingredients:

  • 2 cups all-purpose flour
  • 2 tsp. baking powder
  • 1/4 tsp. baking soda
  • 1/2 tsp. salt
  • 6 tbsps. butter, cold
  • 3/4 cup Greek yogurt
  • 1 egg
  • 1/2 – 1 lb. browned and fine crumbled sausage
  • 2 cups grated cheddar cheese
  • 1/4 cup green onions, sliced thin

Preparation:

Preheat oven to 400 degrees. Line a baking sheet with parchment paper; set aside. In a large bowl, whisk together the dry ingredients of flour, baking powder, baking soda and salt. Cut in the butter until the mixture is crumbly. In a small bowl, whisk together the egg and Greek yogurt and incorporate into the flour mixture along with the cooked sausage, cheddar cheese, and green onions, mixing until it just comes together.

On a lightly floured surface, form the dough into a circle or rectangle, and using a pizza cutter that’s been rolled in a bit of flour, cut scones into triangles. Transfer to the prepared baking sheet and bake for 20-22 minutes or until lightly browned.


Posted in Breakfast, Sausage, Scones, Uncategorized | Leave a comment

Soft Boiled Eggs & Toast

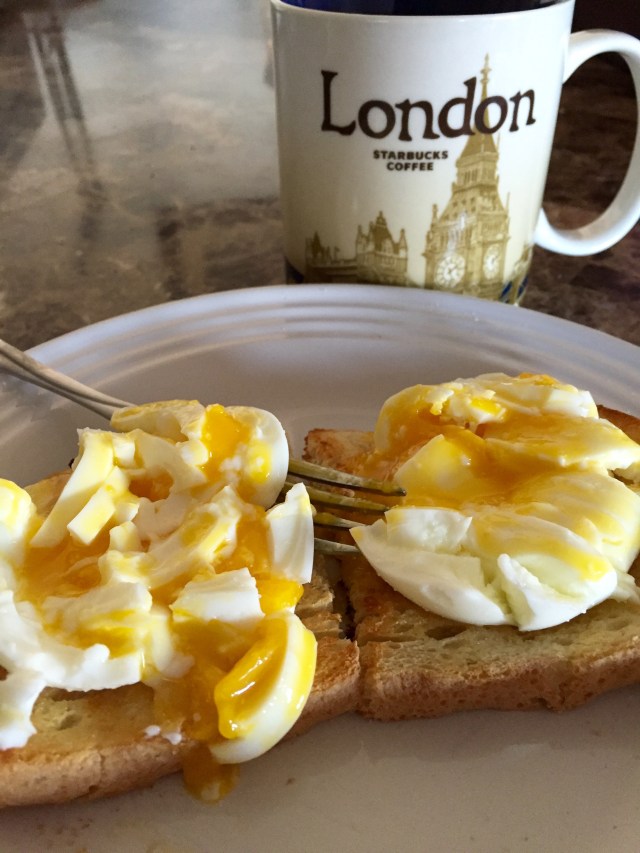
Soft Boiled eggs

When it comes to breakfast during the week, I tend to stick with one thing for long periods of time until I tire of it and move onto the next. Those items over the last several years have included the following, served always with a cup of coffee: scrambled eggs with cheese, 2 Babybel cheeses with Wheat Thin crackers, granola with or without yogurt, breakfast sandwiches, hardboiled eggs, a banana with peanut butter, old fashioned oatmeal with fresh blueberries and walnuts, and most recently, 2 soft boiled eggs with a slice of sourdough toast.

I love the texture of soft boiled eggs and the simplicity of the meal.

The key to making soft boiled eggs is an inch of boiling water, a lid to cover the saucepan, 6 minutes of boiling time for the eggs and then prompt removal from the pan, and 15 seconds of cool water to run over them to help stop the cooking process.

Just before peeling the eggs, I cut a slice of sourdough bread in half and pop in the toaster. To peel the eggs, I use the side of a spoon to crack the eggs around its diameter, and once peeled, I run under warm water to ensure I’ve removed all the specks of shell. About that time, the toast is done. I butter it up and place an egg on each halve of the toast and with the side of a fork, I slice through it and lightly smash and smear the egg against the toast and season with just a touch of fresh ground salt.

Posted in Breakfast, Uncategorized | Leave a comment

Cheesey, Chunky Potato & Ham Soup

Cheesey Potato & Ham Soup


’tis the season of frigid temperatures and comfort food and this soup is the answer to just that kind of day.

Ingredients:

  • 1 white onion, chopped
  • 4 russet potatoes, peeled and diced
  • 1 cup cheddar cheese, shredded
  • 1 32oz. container of chicken stock + 1 14oz. can of chicken broth, if needed
  • 1 cup milk
  • 1/2 lb. cooked, diced ham or bacon
  • S&P, to taste

Preparation:

If you’re using bacon in the soup, cook the bacon in a large skillet until browned and crisp. Transfer the bacon to a plate lined with paper towels, and use the drippings in the skillet to cook the onion and potatoes in. If you’re using ham, but keep reserved bacon grease in your refrigerator, use a tablespoon or two to cook the onions and potatoes in. If you plan on neither, olive or coconut oil, or butter will do just fine to sauté the onions and potatoes. Add the container of chicken stock to help cook the potatoes. Once the potatoes are cooked through and tender, take out half, mash what’s in the skillet (or transfer to a blender to puree smooth) and add in the chunks. Stir in the milk, and add in the cheese, stirring as it melts. If it’s too thick, add additional chicken broth, as needed. Add in the crumbled bacon or diced ham. Serve & enjoy. You’ll have a happy mouth and warm tummy!

Posted in Soup, Uncategorized | Leave a comment

Browned Butter Waffles

Brown Butter Waffles

It never ceases to amaze me how one modification to an ingredient can completely alter the taste. Take butter for instance. On its own, it’s good, multi-purposeful, and enhances just about everything that it’s combined with,  whether baked or cooked. Butter browned takes it up to a whole new level, kicking it up a major notch, and sets it apart from its original state. Browning a stick of butter makes for a rich, nutty, caramel-y kind of taste that can transform waffles into waffles! It’s that hint of something extra, something good.

A few weekends ago, the girls had friends sleepover and the request for breakfast was waffles. Along with the waffles, I made scrambled eggs, and bacon and when my daughters’ friends say things like, “These are so good” and “I love your cooking”, it simply makes me smile.

Ingredients:

  • 1 3/4 cups all-purpose flour
  • 2 tbsps. brown sugar
  • 1 tbsp. baking powder
  • 2 eggs
  • 1 3/4 cups milk
  • 3/4 cups butter = 1/2 cup browned butter*
  • 1 tsp. vanilla extract

Preparation:

In a medium sauce pan, melt the butter over medium heat, stirring occasionally until it turns a warm, amber color and little, dark bits start to form on the bottom of the pan. *The interesting thing about browning butter is that you have to use more from the get go, because once melted, a stick of butter no longer measures to a 1/2 cup of butter, but less. Or in this case, do like I did, and since I’d forgotten this tid bit of information and only used a stick, I found that I was adding tablespoons of solidified butter to the melted part to get it back up to 1/2 cup.* Allow to cool somewhat.

In a large bowl, whisk together the flour, brown sugar, and baking powder; set aside. In a medium bowl, beat together the eggs, milk, browned butter, and vanilla extract. Slowly pour the wet ingredients into the dry and stir until just combined.

Cook on a pre-heated waffle iron until waffles are browned, about 3-5 minutes as waffle irons vary. I sometimes like to make a double batch so that I can freeze the extras for another day. Once the waffles are cooled, I add to a Ziploc bag and place wax paper between the layers so they don’t stick. Place in the freezer for a later use. When ready to use, take 2 out, pop it in the toaster, heat, add butter, if desired, drizzle with syrup and eat. Or, what I like to do is omit the butter and syrup and add scrambled eggs between the two for a waffle sandwich.

Posted in Breakfast, Uncategorized | Leave a comment

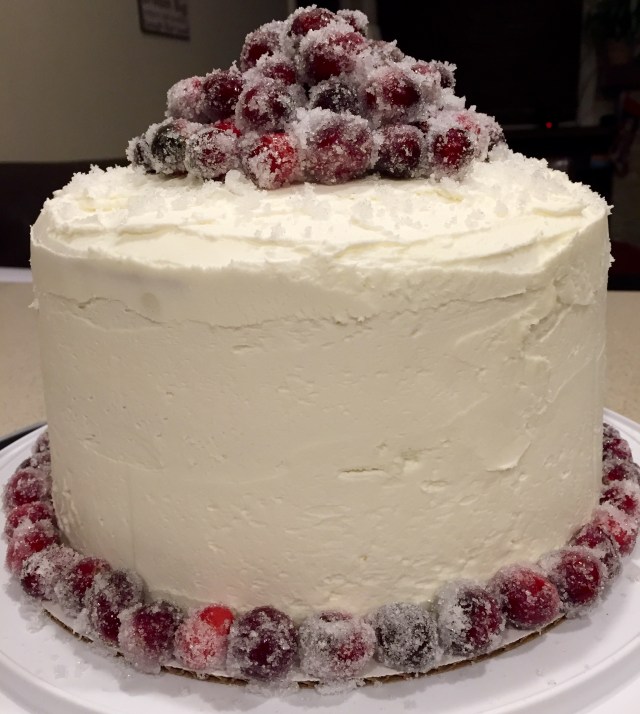
Sparkling Cranberry White Chocolate Cake

Sparkling Cranberry White Chocolate Cake - Whole

Slice of cake

It doesn’t take much to make me happy. I believe wholeheartedly in simple pleasures and enjoying the little moments that, in the end, make for big, memorable moments. The thoughtful cards, smiling eyes, the company of good friends, and robust laughter that brings about snorts and squeals and ends in gasps for breath with tears streaming down cheeks. Last Friday night some dear friends and I gathered around for just the occasion of getting together, story telling, memory making, lots of laughter, drinks and eats. Given the seasonal festivities, I thought it made the perfect time to try out this cake with strict instructions to the girls that I was not going to be taking but a piece of it home. It’s good to have friends who know how to help a girl out and they eagerly obliged. Of course it didn’t hurt that this cake was g-o-o-d good!

Ingredients:

for the sparkling cranberries:

  • 1 cup water
  • 1 cup sugar
  • 2 cups fresh cranberries
  • 1/2 cup sugar to roll cranberries in

for the cake:

  • 3 1/3 cups all-purpose flour
  • 2 cups sugar
  • 2 1/2 tsp. baking powder
  • 1 1/2 cups butter, at room temperature
  • 3 eggs
  • 2 tbsp. vanilla extract
  • 1 cup sour cream
  • 1 cup milk
  • 3 cups fresh cranberries

for the white chocolate frosting:

  • 1 12 oz. bag of white chocolate chips
  • 3/4 cup heavy whipping cream
  • 3/4 cup butter, room temperature
  • 8-9 cups powdered sugar

Preparation:

This is one of those cakes that is started the night before and finished the following day because the cranberries need to sit in a simple syrup overnight to achieve the sparkling effect.

For the sparkling cranberries:

Bring 1 cup sugar and water to a simmer in a saucepan. Simmer until the sugar is completely dissolved. Transfer simple syrup to a heatproof bowl and allow to cool for about 10 minutes. Stir in the cranberries to coat and refrigerate overnight, stirring a few times throughout until ready to use. Using a slotted spoon, remove the cranberries and roll in 1/2 cup of sugar. Toss them a few times to get a couple of layers of sugar on them; set aside to dry.

For the cake:

Preheat oven to 350 degrees. Prepare three 8 or 9 inch (I used 9 inch) round cake pans by greasing the bottoms and sides of the pans and the parchment paper as well; set aside. In a large mixing bowl, whisk together the flour and baking powder; set aside. In the bowl of a stand up mixer, cream together the butter and sugar then add the eggs, vanilla extract, sour cream and milk. Add in the flour and baking powder mixture and stir until just combined. Gently stir in the cranberries. Spread the batter evenly amongst the three prepared cake pans. Bake for 35-40 minutes until a toothpick inserted into the middle comes out with a few crumbs. Allow to cool in the pans for 10 minutes before removing to cooling racks to cool completely. Level cakes if needed prior to frosting.

For the frosting:

Place the white chocolate chips in a metal bowl. In a heat proof liquid measuring cup, microwave the cream until it starts to boil and pour over the white chocolate chips. Cover bowl with saran wrap and wait for 5-7 minutes. Remove the saran wrap and whisk until smooth. Allow ganache to sit until mostly cool. It will be thick. Beat the ganache for 2-3 minutes, until smooth and fluffy. Add the butter and beat until combined. Add the powdered sugar one cup at a time and beat until it is light and fluffy. Add additional cream, as needed, for desired consistency.

To assemble the cake:

Level the cakes and spread one cup of frosting on top of each layer then frost the sides of the cake. Top with sparkling cranberries and along the bottom perimeter of the cake. Add the sugar crumbs to the top of the cake. It looks so pretty.

NOTE: I found that the frosting dried faster than usual, so either add extra cream when preparing or work quickly when applying the frosting to the outside and top of the cake. UPDATED NOTE 12/25/16 – I had an order for this cake for a friend who’s mom turned 75 Christmas Eve. Seeing this note from last year, I added more cream to the frosting without any luck. I think it’s the white chocolate that doesn’t tolerate working with it for long periods of time, but this is purely speculation. I’m certainly no food scientist.

12/25/16 NOTE TO MYSELF: Move the bottom oven rack up one higher and check the cakes at 27 minutes; otherwise, you’ll have to start over since no one likes the bottom of their cakes burned. Sheesh.

Source: http://www.lifeloveandsugar.com/2014/12/08/sparkling-cranberry-white-chocolate-cake/

Posted in Cake, Desserts, Uncategorized | Leave a comment

Tiramisu Sandwich Cookies

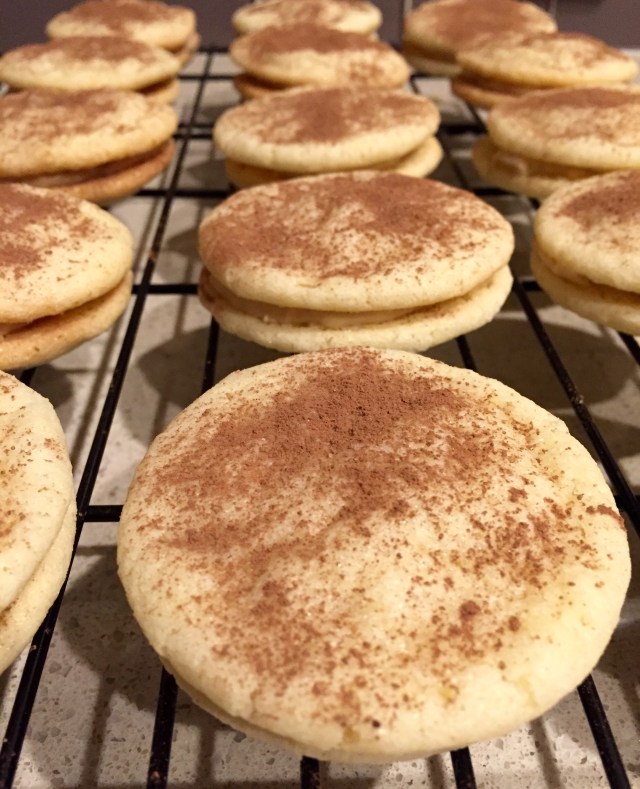
Tiramisu Sandwich Cookies

Every year I like to try out a selection of new Christmas cookies and I’ve had my mind on creating this one for quite some time because I had an inkling this would be my favorite and it was. Admittedly, Tiramisu isn’t necessarily something everyone likes, but if you do, oh boy, this one’s a winner. I sampled one of each of the new cookies I’d made, but this one, I had two and a bit of the extra filling that was left over. I’m definitely making these again. As I mentioned, in another post, I brought all the cookies to work to share and I received this e-mail from a coworker about this cookie:

“Mmm mmm.  The tiramisu cookies are delicious!!” I wholly agree!

Ingredients:

For the cookies:

  • 2 3/4 cups all-purpose flour
  • 2 tsps. baking powder
  • 1/2 tsp. salt
  • 1 1/2 cups sugar
  • 1 cup butter, at room temperature
  • 2 eggs
  • 1/2 cup sugar for rolling dough balls in
  • sweetened ground chocolate powder (Ghirardelli)

For the filling:

  • 1 8oz container of mascarpone cheese
  • 2 tbsp. butter, at room temperature
  • 1 tsp. espresso powder
  • 2 tbsp. amaretto liquor
  • 2 cups powdered sugar, sifted

Preparation:

For the cookies:

Preheat the oven to 350 degrees. Line a baking sheet with parchment paper; set aside. In a large bowl, whisk together the flour, baking powder, and salt; set aside. Using a stand up mixer, cream together the butter and sugar together until light and fluffy, about 3 minutes. Add the eggs one at a time, mixing well after each. Reduce the speed to low and slowly incorporate the flour mixture, stir until combined. Using a small cookie scoop, make balls, and toss in the sugar, and using the rounded bottom of a glass, press lightly on each dough ball allowing at least an inch apart on the prepared baking sheet. Bake for8-10 minutes, or until edges are golden. Transfer to cooling rack.

For the filling:

In a small glass, whisk together the espresso powder and amaretto liquor; set aside. Beat together the mascarpone cheese and butter on high speed. Stir in the espresso/ amaretto mixture and then add in the powdered sugar 1 cup at a time. Beat until light and fluffy.

Match up the cookies according to similar sizes. Using a butter knife, spread about 1 tbsp. of filling on the bottom side of the cookie and press the bottom side of another cookie together creating a sandwich. Once finished, sift a small amount of ground sweetened chocolate onto the tops of each cookie.


Posted in Christmas Cookies, Cookies | Leave a comment

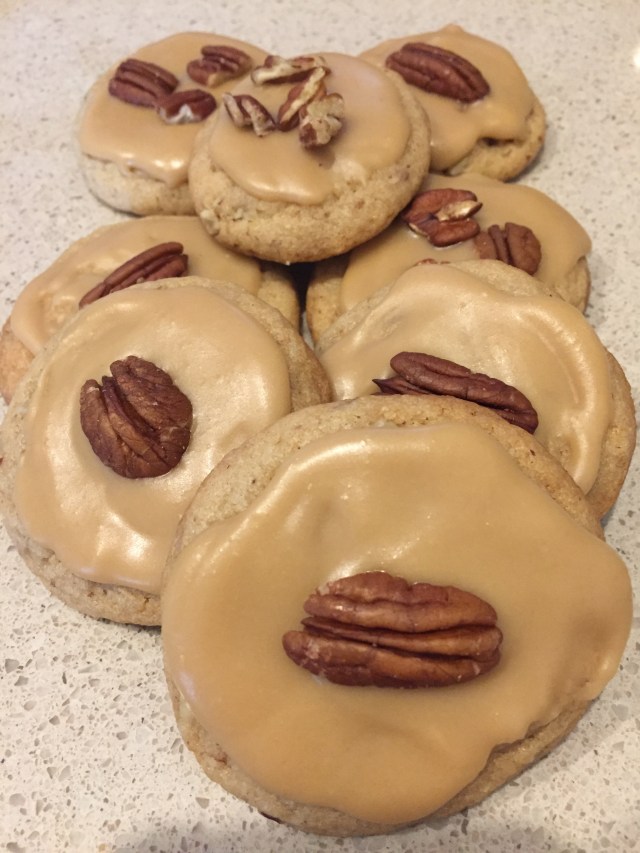
Brown Sugar Pecan Cookies

Brown Sugar Pecan Cookies

I’m surprised I had many of these left. Every time I looked over, Chris was snacking on another one. At one point, with evidence of crumbs on the corners of his mouth, and cookie in hand, he looked at me and said, “These are awful!” If he was a winking kind of guy, this would have been the prime opportunity to implement one. I knew right away he’d like this cookie and it didn’t even have the frosting on it yet, not that it stopped him once it did.

Ingredients:

For the cookies:

  • 1 cup butter, at room temperature
  • 1/2 cup sugar
  • 1/2 cup brown sugar
  • 1 egg
  • 1 tsp. vanilla extract
  • 2 cups flour
  • 1/2 tsp. baking soda
  • 1/4 tsp. salt
  • 1/2 cup pecans, toasted & finely chopped
  • 36 pecan halves, or chopped pecans

For the frosting:

  • 1 cup packed brown sugar
  • 1/2 cup milk
  • 1 tbsp. butter
  • 1 1/2 cups powdered sugar, sifted

Preparation

For the cookies:

Preheat the oven to 350 degrees. Line the baking sheet with parchment paper; set aside. On another smaller baking sheet, toast the 1/2 cup of pecans for 3-5 minutes. Once cool, chop.

In the bowl of a stand mixer, beat together the butter and sugars until light and fluffy. Add in the egg and vanilla and beat until combined. Add in flour, baking soda, salt, & beat until combined. Stir in chopped, toasted pecans. Cover and refrigerate for 30 minutes or more. Preheat oven to 350. Shape into 1 inch balls and place a couple of inches apart on prepared baking sheet. Bake 10-12 minutes or until set (not glossy in the middle) and lightly browned at the edges. Cool completely before frosting.

For the frosting:

Combine brown sugar and milk in a small pot over medium heat. Bring to a boil and boil for 3-4 minutes, stirring constantly. Remove from heat and stir in butter. Stir in powdered sugar and whisk until smooth. The frosting will firm up dramatically within a few minutes. Spread each cookie with about 1 tbsp. frosting and then top with pecans. At about the halfway mark, I had to stir in a bit more of milk to smooth out the frosting. Allow the frosting to set before storing.

Source: http://www.thereciperebel.com/brown-sugar-pecan-cookies/

Note: One of the e-mail thank you’s I received about this cookie: “YUMMO!!!  The cookies with the carmel(?) and pecan on top are to die for!!”


Posted in Christmas Cookies, Cookies | Leave a comment

Peppermint Crinkle Cookies

Peppermint Crinkle Cookies

This is the 2nd cookie I baked yesterday. These are little and pack a big chocolate-y punch. They’re a soft cookie that have a fudgy brownie like center. Of course, the peppermint adds that touch of Christmas season and can be easily omitted if that’s not your thing. Either way these are mighty good.

Ingredients:

  • 1 1/3 cup of all-purpose flour
  • 2 tbsp. unsweetened cocoa powder
  • 1 cup dark chocolate (65% cacao) chips
  • 2 tbsps. unsalted butter
  • 1/4 cup Nutella
  • 2 eggs
  • 1 egg white
  • 3/4 cup sugar
  • 1 tsp. peppermint extract
  • 1 cup confectioner’s sugar

Preparation:

In a small bowl, whisk together the flour and cocoa powder; set aside. In a medium sized sauce pan over low-medium heat, add the chocolate, butter, and Nutella (no, the Nutella doesn’t alter the taste of the cookies, but rather provides moisture)  and stir until ingredients are melted and combined; remove from heat and set aside. Place the eggs, egg white, and sugar in a bowl and beat until the mixture is light in color and thick and fluffy in appearance with large bubbles (mixture will resemble pancake batter). Add in the peppermint extract and beat to combine. Gradually fold in the chocolate mixture into the egg mixture and beat on low to combine. Slowly incorporate flour mixture until no streaks appear. Chill dough for 20-30 minutes.

Preheat the oven to 350 degrees and line baking sheet with parchment paper; set aside. Place the confectioner sugar in large bowl. Remove the dough from the refrigerator and using a tablespoon, form into balls. Add the dough balls into the confectioner sugar and roll around to coat heavily. Place balls on prepared baking sheet approximately one inch apart (these don’t spread much while baking). Bake for 10-12 minutes. Allow to cool on baking sheet for 1-2 minute. The cookies will form a dome on top, use a spatula to press down lightly on the tops of each cookie. Transfer to cooling rack.

Source: http://www.bakersroyale.com/cookies/peppermint-crinkle-cookies/


Posted in Christmas Cookies, Cookies | 2 Comments