Praline Carrot Cake


carrot cake on fork

I tend to shy away from statements like “This is the best (fill in the blank)” because it’s used too freely, but mostly, because ‘best ever’ is really a matter of preference. You say tomato, I say tomahto, type of situation. So instead of proclaiming this is the best carrot cake ever, I will simply say 2 things:

  1. This is hands down my favorite carrot cake. It’s in a class all on its own and stands out far above the rest.
  2. I’ve never known anyone, who, after taking a bite of this cake for the first time, didn’t close their eyes and “mmmm” simultaneously.

whole carrot cake

This recipe has been in the family file for a good while. My mom is a retired nurse, but back in the days of working in the recovery room, a fellow nurse made this cake for her birthday one year. Mom is a self proclaimed chocoholic, preferring chocolate over any other dessert. In my mind, I imagine her being gracious and thanking the woman who made this for her, and on the inside being slightly disappointed that it wasn’t chocolate with chocolate oozing more chocolate. Until she took her first bite. Refer back to the above referenced second comment.

Slice of carrot cake

You’ll have to try it out for yourself to determine if it’s worthy of the label “Best”. I can say with utmost certainty, if you like carrot cake, you will undoubtedly be quite pleased as will those that you share it with. My birthday was this past Sunday and it kicks off the rest of the family’s birthdays as well. Since I enjoy baking so much, it doesn’t bother me to bake my own cake; in fact, I prefer it. This rounded out our Easter dinner nicely. I promptly boxed up the remainder of the cake to take to work the next day. With four birthdays in a matter of weeks, we tend to get “caked out”, if you know what I mean. Although, I will say, this cake freezes well. It’s packed with dense, yummy richness, so a little bit goes a long way. My coworkers didn’t disappoint and they ate it up; one of them even stopped to tell me it reminded me of her late grandmother’s cake, but better. Ah, yes, food + memories = love.

Ingredients:

for the cake –

  • 1 lb. carrots (3 cups sliced)
  • 3 cups flour
  • 2 3/4 cups sugar
  • 1 1/2 tsp. baking powder
  • 1 1/2 tsp. baking soda
  • 1 tsp. salt
  • 2 tsp. cinnamon
  • 1 1/3 cups oil (I used melted & cooled coconut oil, but you can use Canola/ Vegetable)
  • 6 eggs
  • 1 8 oz. can crushed pineapple, drained (you won’t be able to taste it in the cake)
  • 1 tbsp. vanilla extract
  • 1 cup pecans, toasted and chopped
  • 1/2 cup shredded coconut

for the praline sauce

  • 3 tbsp. butter
  • 3 tbsp. brown sugar
  • 2 tbsp. heavy cream
  • 1 tsp. vanilla

for the candied pecans –

  • 1/2 cup brown sugar
  • 2 tbsp. orange juice
  • 1 cup pecans

for the cream cheese frosting –

  • 1 8oz package of cream cheese, at room temperature
  • 1/2 cup butter, at room temperature
  • 1 tsp. cinnamon
  • 1 tsp. vanilla extract
  • 6 cups powdered sugar
  • 2-4 tbsp. milk

Preparation:

for the cake –

Cook carrots in boiling water until soft. Drain and chop; set aside. Preheat oven to 350 degrees. Grease, line with parchment paper, and grease again 3 9 inch round pans. In a large bowl, whisk together the dry ingredients, create a crater, add eggs, vanilla, oil, & pineapple. Beat on low speed for 1 minute and then add chopped pecans, carrots, & coconut. Pour evenly amongst the 3 prepared pans. Bake for 35-40 minutes, but depending on how the oven cooks, start checking at 28 minutes. Remove from oven when toothpick inserted into the middle of each pan comes out clean. Allow cakes to cool, in pans, on cooling racks for 15-20 minutes before removing from pans to cool completely.

for the praline sauce –

In a saucepan, melt butter over medium heat. Stir in brown sugar and cream, stirring until it comes to a full boil. Reduce heat to a gentle boil for 3 minutes. Stir occasionally, remove from stove, stir in vanilla and let cool.

for the candied pecans –

Preheat oven to 325 degrees. Lightly grease an 8 inch square pan. Combine brown sugar and orange juice, add pecan halves. Pour into pan and bake for 6 minutes, stir, and bake for another 6 minutes until nuts are brown and syrup is bubbly. Separate nuts on lightly greased baking sheet until cool.

for the cream cheese frosting –

Mix together the cream cheese, butter, cinnamon, and vanilla until light and fluffy. Gradually, add powdered sugar, one cup at a time, scraping the sides and bottom of the bowl after each addition. Once all the powdered sugar has been added, add milk, one tablespoon at a time until desired consistency is reached.
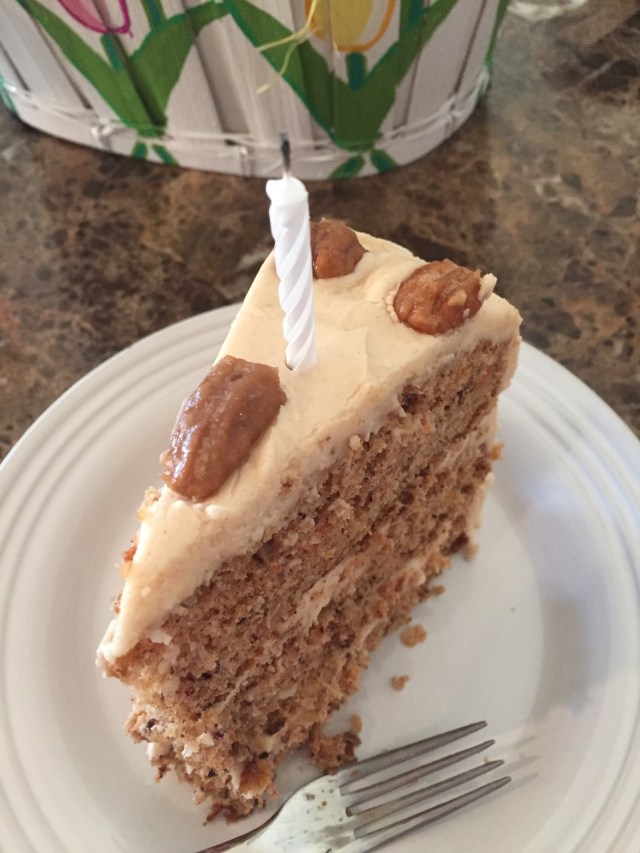
Assemble the cake

Starting with the bottom layer of cake, spread one inch of frosting on the top. Pour half of the praline sauce on the cake, blending into the frosting. Repeat same steps with second layer of cake, pouring the remaining sauce on cake, and blending in. Top with final layer of cake, frost all over, and add candied pecans.

NOTES: This can be a lengthy process, albeit worth it, if done all in one day. I made the cakes the weekend before. Once they were completely cool, I wrapped them in plastic wrap, stored them in gallon size bags, and placed them in the freezer. I made the candied pecans the night before and finished the process the day of.

Sharing with everyone at http://fiestafriday.net/ and http://www.thecountrycook.net/


Posted in Cake, Desserts | 12 Comments

Homemade Ding Dongs


best ding dong

I met one of my very best friends almost 15 years ago. I’d recently returned from maternity leave with Brianna and was working at the School of Medicine in the HIV program. There was an increase in the numbers of Spanish speaking individuals getting diagnosed and my supervisor decided it would be worth our while to learn Spanish. Enter Jaime. She owned her own business and one of the components was teaching people Spanish, or in some cases, teaching Spanish speakers English. I remember our first conversation. It was over the phone to schedule our first class. I heard a baby in the background and immediately thought, this is someone I could become friends with. As a new mom, and still relatively new to the area, I didn’t have but one friend with a little one. I later learned that the baby in the background was her nephew that she was babysitting. Her kids would come a few years later.

Whole Ding Dong with drizzle

Fast forward all these years and we’ve been through quite a bit together. As she wrote me last year, ‘through thick and thin, but really more like hard and harder.’ As is the case with true friends, they journey on in life with us not because they have to, but because they want to. Those are the keepers. The ones with whom you can share every day experiences, secrets, dreams, fears, tears, and so much laughter that sometimes end in tears. Today is her 40th birthday and even though it’s hump day, we celebrated both of our birthdays this past Friday. We went to see The Golden Girls play. How appropriate to celebrate us and our friendship by looking at each other as we sang along to ‘thank you for being a friend.’

Ding Ding half

I knew when I first saw this recipe, I would make them for her because we once had a sleepover at her house where she provided all the snacks, including the individually wrapped in tin foil Hostess Ding Dongs because she loved them. I packaged up some for her and her family and my family ate the rest. They were a big hit. Of course, I wanted her to have the best looking ones so the photo above was of one of the cupcakes that I’d filled a bit too much so that the top started to bust apart. Even with the top covered in chocolate, you can still see the crack. That’s what happens when I fill cupcakes for the first time: a learning experience. Such is life. Also, these photos were from shortly after they were made and I hadn’t let the ganache rest long enough to harden. No worries, though. If you decide to make these, store in the refrigerator and the coating will firm right up.

Ingredients:

for the cake :

  • 3 ounces semi sweet baking chocolate (you can use chocolate chips)
  • 1 1/2 cups brewed coffee
  • 3 cups sugar
  • 2 1/2 cups all purpose flour
  • 1 1/2 cups unsweetened cocoa powder
  • 2 teaspoons baking soda
  • 1 teaspoon baking powder
  • 1 teaspoon salt
  • 3 eggs
  • 3/4 cup vegetable oil
  • 1 1/2 cups buttermilk, room temperature
  • 1 teaspoon vanilla

for the cream filling:

  • 5 tablespoons all purpose flour
  • 1 cup milk
  • 1 teaspoon vanilla
  • 1 cup butter
  • 1 cup granulated sugar

for the ganache:

  • 1 12 ounce bag semi-sweet chocolate chips
  • 1 cup heavy cream
  • 1 tablespoon butter

Preparation:

for the cupcakes:

Preheat oven to 325 degrees. Spray muffin tins well with non-stick spray; set aside. Cupcake liners are not necessary so be sure that muffin tins are greased well. Chop chocolate so no pieces are larger than a chocolate chip. Place chocolate in a medium bowl or a 2 cup measuring cup and pour hot coffee over chocolate. Let sit for 5 minutes then stir, making sure all chocolate is melted and well combined with coffee. Set aside to cool. Sift all dry ingredients together-sugar, flour, cocoa, baking powder, baking soda and salt. In the a large mixing bowl (or the mixing bowl of your stand mixer) beat eggs on medium speed until frothy. Slowly add oil, buttermilk, vanilla and chocolate-coffee mixture to eggs, beating well to blend. Add in sugar/flour/cocoa mixture, one cup at a time, mixing just to combine after each addition. Pour batter 2/3 full into the muffin tins. Bake in a preheated 325 degree oven for 20-25 minutes, inserting a toothpick in the middle to test for doneness. Let cupcakes cool for 10 minutes in pan. Run a butter knife around each cupcake to loosen before turning out onto a cooling rack.

To bake as a cake: Pour batter into 2 9 inch cake pans that have been well greased and lined with parchment paper on the bottom. Bake in a preheated 325 degree oven for 45-50 minutes, using toothpick to test for doneness. Let cakes cool completely in pan. Using a plastic knife, run knife around edges to loosen before turning out onto rack or plate. NOTE: the original recipe warns of batter spilling over, so many of the commenters wrote of how they filled appropriately and also made a few cupcakes.

for the cream filling:

Pour cold milk into a small saucepan. Before turning on the heat, whisk in flour so no lumps remain. Turn heat on to medium low, and stirring, heat until mixture is thick, like a roux. Remove from heat, stir in vanilla and let cool completely. Cream together butter and sugar on medium high speed, until fluffy, about 8 minutes. Add in the milk mixture and beat again until mixture resembles a whipped cream.

Transfer the filling into a piping bag, and using desired tip, slowly fill cupcakes, smoothing off the tops, as necessary.

To prepare as a cake: Place one layer of cake on an 8 inch cake circle, top side down. Cover with a thick layer of cream filling then place top layer of cake, top side down, on top of filling gently pressing down to secure layers. Place cake on a wire rack on top of a wax paper lined cookie sheet.

for the ganache:

Place chocolate chips in a large measuring cup. Heat cream and butter in a medium saucepan over medium heat until boiling, careful not to scorch. Pour heated cream over chocolate chips and let sit for 5 minutes. Stir chocolate to make sure completely melted and smooth.

Place wax paper or parchment paper underneath cooling racks, and place cream-filled cupcakes onto the cooling racks, spacing an inch or two apart. Using a serving spoon, or small ladle, pour ganache onto each cupcake, letting it run down the sides. Refrigerate for 1-2 hours.

To prepare as a cake: Slowly pour ganache over top of cake, letting it drip down the sides. If needed use a spatula to help spread ganache on top over sides. When ganache is set, cake can be transferred to a serving plate. Chill cake for 4 hours before serving.

Source: http://chocolatechocolateandmore.com/ding-dong-cake/


Posted in Cupcakes, Desserts, Uncategorized | Leave a comment

Teriyaki Chicken Pineapple Bowls

Teriyaki Chicken Pineapple Boats

My husband has gotten into the habit of sending me recipes that he sees and wants to try out (read: have me cook). Truth be told, this one surprised me because he’s not really a fan of Teriyaki chicken, but he sure did eat this up, post a picture on Facebook raving about it, and then proceeded to polish off what the girls didn’t finish. We’ll just go ahead and call that a success.

Ingredients:

Serves 4

  • 2 pineapples
  • 2 tbsps. oil (I used refined coconut oil)
  • 2 lbs. boneless/ skinless chicken thighs, cut into bite-size pieces
  • 1 1/2 cups soy sauce (I used reduced sodium)
  • 1/2 cup brown sugar
  • 1/2 cup honey (I used raw honey)
  • 5 tbsps. sesame seeds
  • 4 cups cooked white rice, divided (I used Jasmine rice)

Preparation:

Slice each pineapple in half, lengthwise. I put Chris to work on these and he cut of the stems, but you can leave them on for aesthetics, if you’d like. Scoop out the insides of each of the pineapple halves leaving about a 1/2 inch thickness to maintain the sturdiness. Dice the pineapple and serve with the meal or refrigerate for later. Drain any juice that remains in the shell; set aside.

If you plan to use something other than instant rice, start with the rice so that it cooks and is finished at the same time as the chicken.

Heat a large skillet to medium-high heat, add oil, and cook chicken for 3-5 minutes, stirring occasionally. In a small bowl, whisk together the soy sauce, brown sugar, and honey and add to the chicken. Increase the heat to high to bring the mixture to a boil, then reduce to medium and cook for 10-12 minutes, or until chicken is cooked all the way through and the sauce has thickened. Remove from heat and stir in the sesame seeds.

Assemble in pineapple boats, serve, and enjoy.

Sharing with everyone at http://fiestafriday.net/

Source:  http://www.buzzfeed.com/christinebyrne/teriyaki-chicken-inside-a-pineapple?bffbfood&utm_term=.wpPMprAnWL#.vd5QxvNDR4


Posted in Chicken | 2 Comments

Strawberry Scones

strawberry scones

Out of all my scone recipes, this one is the very first I ever made, and by far, my favorite. They’re simple and simply sweet.

Ingredients:

for the scones:

  • 2 1/2 cups flour
  • 1/2 cup sugar
  • 1/2 tsp. salt
  • 1/2 tsp. baking soda
  • 2 tsps. baking powder
  • 8 tbsps. cold butter, cut into small pieces
  • 2/3 cups half & half
  • 1 egg
  • 1 tsp. vanilla extract
  • 8-10 strawberries, stems removed & diced, 2 tbsps. reserved
  • 1 tablespoon half & half

for the glaze:

  • 1-2 tbsps. of diced strawberries
  • 1 cup powdered sugar
  • 2-3 tsps. half & half

Preparation:

Preheat the oven to 4oo degrees. Line a baking sheet with parchment paper; set aside. In a food processor, combine the flour, sugar, salt, baking soda, baking powder, and butter. Pulse until the mixture becomes coarse and crumbly and transfer to a large bowl. In a small bowl, beat the egg and stir in the half and half and vanilla extract. Pour the egg/ cream mixture into the dry dough and stir until just combined. Stir in the diced strawberries.

Transfer the dough onto a lightly floured surface, sprinkle with a little bit of flour, and fold a few times. Using a biscuit cutter, cut out the circles and place on the prepared baking pan. Brush each scone with half & half and then bake for 12-13 minutes. Remove from oven and allow to cool for 5 minutes.

In a 2 cup liquid measuring cup, add the diced strawberries and using the back of a spoon, mash slightly. Add the powdered sugar and stir in the half and half until desired consistency is reached and pour glaze over the top of scones.

Sharing with everyone at: http://www.fiestafriday.net

Adapted from: http://www.jamhands.net/2014/03/strawberry-scones.html


Posted in Breakfast, Scones | 12 Comments

Cream Puffs

cream puffs

Out of my daughters, Leah is the one who can be found in the kitchen making breakfast, cooking or baking something. Bri will be found there too, enjoying whatever it is that’s been made as well as cleaning up the kitchen as they’ve struck a deal that whichever one cooks, the other one cleans up, so it’s usually Bri on kitchen duty. Recently, Leah had a class project on Germany and decided, after perusing the internet, she wanted to bring homemade cream puffs to share with the class in addition to her presentation. Like mother like daughter, she opted to do a trial run. She made everything herself and I only assisted her in the assembly of the cream puffs by piping in the filling as she held onto the puffs. Naturally, we did a taste test and what ensued was lots of giggles, filling, and smeared napkins!

It’d been years since I’d had a cream puff, perhaps even decades so I was caught off guard when I bit into it and the filling seemed to go everywhere but my mouth. Leah bit into hers and had the same result. At that moment, we decisively agreed something significantly less messy would be a better option to serve to her class. She packed up the rest of the cream puffs and took them to her friend’s house that night where she and a few of her other friends spent the night, and in the morning, she told me how even though she warned her friends, they had the same experience.

Ingredients:

for the puffs:

  • 1 cup water
  • 1/2 cup butter
  • pinch salt
  • 1 cup all-purpose flour
  • 4 eggs

for the filling:

  • 2 cups whipping cream
  • 1 package instant vanilla pudding mix

Preparation:

for the puffs:

Preheat oven to 400 F. Line a baking sheet with parchment paper; set aside. In a medium size sauce pan, bring the water, butter, and salt to boil and boil until butter is melted. Remove from the heat (but don’t turn the heat off as you’ll return to it in a moment) and add all the flour at once, stirring until smooth and mixture comes away from the sides of the pan. Return to the heat and stirring constantly, cook for 1 minute.

Allow to cool slightly for a few minutes, and beat in the eggs, one at a time, mixing well after each addition. Drop by tablespoons onto the baking sheet, leaving space between the puffs. Bake for 20-30 minutes or until golden and crisp. DO NOT open the oven door during the first half of baking or the puffs wills collapse.

Upon removing rom the oven, immediately cut a small slit in the side of each puff to release the steam. Allow the puffs to cool thoroughly. Once completely cooled, using a sharp, serrated knife, cut the tops off each one or pipe the filling into the puff.

for the filling:

Prepare the filling by whipping together the whipping cream and instant pudding mix until thick. Pipe filling into the puffs. Sprinkle with powdered sugar, if desired.

Source: http://www.quick-german-recipes.com/cream-puff-recipe.html


Posted in Desserts | Leave a comment

Fresh Homemade Salsa

Fresh Salsa with chip

I’m of the belief that if you have the ingredients on hand, homemade is always, always mo’ better than jarred. I also wonder, why buy “fresh” salsa when it’s so easy to make at home? Not to mention cheaper. I almost always have jalapenos, either on the counter or ones that I’ve tossed in the freezer to use as I need to. Canned tomatoes work just as well as fresh. Toss it all in the food processor, give it a whirl, and ta da! You’ve got some yummy salsa to dip your chips into, or add to your scrambled eggs, or use in various recipes. Another advantage to making it yourself is that you can doctor it up so it’s exactly the way you like it. Hotter? Add more jalapenos or even a habanero. Garlicky? Add one or two more cloves. You like a chunkier salsa? Control the pulsing of the food processor or blender. You get the drift. But the true bonus? You can’t really mess it up. Now how’s that for cooking 101?!

Ingredients:

  • 1/2 of a large onion or a whole small onion (I’ve used red, yellow, and even white – it’s just preference or what you have on hand)
  • 1 26oz. can of diced tomatoes, drained with juice reserved in case you want a thinner salsa
  • 1 or 2 jalapenos, deseeded and membranes removed (or toss the whole dang thing in there! minus the stems, of course)
  • the juice of 1/2 of a lime
  • 1 tsp. kosher salt
  • 1/2 tsp. cumin
  • 1/2 cup of cilantro
  • 2 cloves of garlic

Preparation:

Toss the above ingredients into a food processor or blender, and pulse until desired consistency is obtained. If needed, add in some of the reserved water from the tomatoes. Transfer to a sealed container and store in the refrigerator for up to 2 weeks.

Posted in Appetizers, Homemade Spices/ Sauces & Mix, Mexican, No-bake, Sides | 2 Comments

Cuban Style Pork Shoulder

Cuban Style Pork Shoulder

For a slightly different taste, use the following marinade for your pork burritos. To be honest, I was surprised the flavoring wasn’t more intense as I’d let it marinate for nearly 24 hours prior to cooking. I guess I was expecting something more intense and tangy with pizzazz based on the medley of ingredients, but it just didn’t come out that way. Don’t get me wrong, it’s still quite flavorful and Chris and the girls thought it had a great flavor and requested I make it like this again so I will. As long as we’re being honest, it’s not like you can go wrong with burritos anyway, right?

Ingredients:

  • 3/4 cup extra-virgin olive oil
  • 1 tablespoon orange zest
  • 3/4 cup fresh orange juice (10-12 oranges)
  • 1/2 cup fresh lime juice (4 limes)
  • 1 cup cilantro, finely chopped
  • 1/4 cup lightly packed mint leaves, finely chopped
  • 8 garlic cloves
  • 1 tablespoon minced oregano (2 teaspoons dried oregano)
  • 2 teaspoons ground cumin
  • Kosher salt and pepper
  • 3 and 1/2 pounds boneless pork shoulder, in one piece

Preparation:

Add the following to a food processor: olive oil, orange zest, freshly squeezed orange juice, lime juice, cilantro, mint leaves, crushed garlic cloves, oregano, and cumin, and pulse until everything is finely chopped.

Using a knife, pinprick the pork shoulder; set aside. Using a roasting bag (I always have a leftover one from Thanksgiving), insert the pork shoulder and pour the marinade in, securing in place with a tie, place in a baking dish and refrigerate overnight. In the morning, rotate the bag so it’s lying on the opposite side from the previous night.

When ready to bake, preheat oven to 425 degrees

For easy clean up, line a baking sheet with aluminum foil and spray a wire rack with non-stick spray and place inside the rimmed baking sheet. Place the pork on the rack and season liberally with S&P.

Roast the pork for 30 minutes until lightly browned. Reduce the oven temp to 375 and roast for another hour and a half, or until meat thermometer reads 160. Transfer to a cutting board, cover with foil, and allow to rest for 20 minutes. Carve, chop, and add to burritos and serve with rice and beans.

Cuban pork shoulder rolled

Source: http://thefoodcharlatan.com/2015/04/09/cuban-mojo-marinated-pork-recipe/


Posted in Mexican, Pork | Leave a comment

Cheddar’s Banana Bread

Cheddar's Banana Bread

As a family, we generally eat out once a week, and given our schedules, this tends to occur on a Friday night. One of our go-to restaurants is Cheddar’s. I’d first gone there with Chris way back when on one of my first visits to Texas with him. We didn’t have any in Colorado and then after about 9 years or so of living in Kansas, they opened up one not far from our house and it’s been a place we frequent with regularity ever since. A few months back, instead of the standard black folders that the server brings for the bill, they brought a little clipboard instead. I’m not sure which one of us paid (it all comes from the same account, anyway), but we discovered that underneath the bill was a recipe to take home for a non-menu item. Intrigued, as per usual, when it comes to recipes, I tossed it in my purse and promptly forgot about it in the abyss the purse of a mom so easily turns into. I stumbled across it and had bananas ready to use and so I put the recipe to test. This may be our new favorite banana bread recipe.

Cheddar's Banana Bread Recipe

I don’t recall if I used shortening the first time around when I made it, or opted for butter, but FYI: butter works just as well as I’m sure melted & cooled coconut oil would work. Given our oven, I reduced the oven temp to 325 and have made this (with adjusted baking times) for the 4 little loaves as well as the 8 mini loaf pan.

Posted in Bread/ Muffins, Bread; Sides, Breakfast | Leave a comment

No-Bake Peanut Butter Cheesecake Pie

PB Pie

Oh, friends! If you, like so many of us, love the perfect pairing of peanut butter and chocolate, then this might just find it’s way into your dessert rotation. It’s smooth, creamy, and oh so filling so a little bit goes a long way. I made this for our Super Bowl party this past Sunday and we finished it up last night.

Ingredients:

for the crust:

  • 1 package Oreos, crushed (minus 7 or 8 if you have sneaky fingers in the kitchen while preparing like I did)
  • 6 tbsps. unsalted butter, melted

for the filling:

  • 2 packages of cream cheese, at room temperature
  • 2 cups powdered sugar, sifted
  • 1 1/2 cups creamy peanut butter
  • 1 tbsp. vanilla extract
  • 2 tbsps. unsalted butter, melted & cooled
  • 1 cup heavy whipping cream

for the ganache:

  • 3/4 cup heavy whipping cream
  • 1 cup semisweet chocolate chips

Preparation:

While the cheesecake portion is no-bake, I opted to bake the crust for a firmer rather than crumbly crust, but by all means, you don’t have to bake the crust. It’s all preference, anyway. Crush the Oreos to a fine crumb and incorporate the butter, mixing until well blended. If baking, preheat the oven to 350 degrees. I used a 9 inch spring form pan though you can just as easily use a 9 inch deep dish pie pan. Press the Oreo mixture into the bottom of the pan and bake for 6-7 minutes. Transfer to a cooling rack and cool completely.

In a large bowl, beat together the cream cheese and powdered sugar until fully incorporated. Gradually, beat in the cooled, melted butter. Add the peanut butter and vanilla extract; beat well and set aside. In a separate bowl, whip the heavy cream until soft peaks form. Using a spatula, gently fold in the whipped cream into the peanut butter cream cheese mixture, being careful not to over stir. Transfer into the prepared crust and refrigerate for several hours or overnight to set.

A few hours before serving, prepare the ganache. In a liquid measuring cup, heat the cream until it starts to boil. Place the chocolate chips in a bowl and pour the hot cream over the chips, stirring together until fully melted and incorporated. Cool slightly and spread evenly over the pie. Chill until served.

Posted in Desserts, No-bake, Pie, Uncategorized | Leave a comment

Ham & Salami Stromboli


Salami & Ham Stromboli

Sometimes what was originally intended for dinner falls to the wayside when unexpected life events throw a wrench into your plans and you have to come up quick with Plan B. Thankfully, I had all the ingredients on hand last night and even homemade frozen pizza sauce in the freezer. I’m happy to report Plan B was a tasty succes!

Ingredients:

  • pizza dough (home made or you can buy the ready made kind)
  • 1 tbsp. olive oil
  • 4 garlic cloves, crushed
  • 1 tsp. Oregano
  • 1 tsp. Basil
  • 1 tsp. Italian Seasonings
  • 1/2 tsp. poppy seeds
  • 2 tbsp. parmesan, grated
  • 4 oz. Mozzarella slices
  • 2 oz. deli ham, sliced
  • 2 oz. salami, sliced
  • 1 egg
  • 2 tbsp. water
  • Marinara or pizza sauce for dipping

Preparation:

Preheat oven to 400 degrees. Line a baking sheet with parchment paper; set aside. Prepare your dough and roll into a rectangle or unroll the ready made dough and shape into a rectangle. Make the egg wash by whisking together the egg with 2 tbsp. water. Transfer dough to the prepared baking sheet and brush 1″ around edge with egg wash. Drizzle the olive oil over the center and spread up to the edge of the egg wash. Crush the garlic and sprinkle over the olive oil.

In a small bowl, whisk together the oregano, basil, Italian seasonings and parmesan cheese. Sprinkle 2/3 of the seasoning mix over the garlic. Layer the mozzarella cheese in rows over the seasoning mix. Over half of the rectangle, layer the ham in rows and over the other half layer with the salami in rows. Starting from the side with the salami, tightly roll to the other side, pinching the sides to seal. Roll seam side down and brush with egg wash. Add the poppy seeds to the remaining seasoning mix and sprinkle over the top of the Stromboli. Using a serrated knife, make light diagonal slashes along the length of the Stromboli. Bake for 15-17 minutes or until golden brown. Allow to rest for 3-5 minutes before cutting. Serve with warm marinara sauce.

Sharing with everyone over at http://www.FiestaFriday.net

Adapted from:  http://www.yummly.com/recipe/external/Ham-and-Salami-Stromboli-Recipe-_-Easy-Game-Day-983772


Posted in Italian, sandwiches, Uncategorized | 3 Comments